-
-
-
Senior Member
Undisclosed Pod

Saving money on supplies that stink and make everyone in your house hate you is kind of false economy, no? But, you've already got this far, good luck with the rest! 
Here's a trick, next batch of scales, put them onto a flat layer of clay and press them down so no molding material gets under it. Then make a clay wall around the whole business and pour your resin into your 'clay bowl of scales'. Once it cures, the clay should come right off without having to dig!
-
Thanks! I'll have to try that 
The crash of waves and salty air are the signs of freedom
-
Another tip! scraping the clay out of my resin was a real pain, but I used some vegetable oil and a toothbrush to help break down the clay and it really helped! Since your clay is water based you might could just use water and a toothbrush to break it down.
Sent from my iPhone using Tapatalk
-
-
Got my pigment today! Don't have pictures but I decided on a blue, gold and orange color scheme! I also decided that my scales we're going to be too small so I found a egg shaped cookie cutter and fell in love with the bigger scales.

I still have to sketch out my new idea at some point, maybe tomorrow. Hopefully i will be getting my silicone by the end of this month, I'm so excited!
I have a question too, while at the store today they were out of pearl ex blue but had this other dye that they guy said could work, any experience with the kind of pigment in the picture below?

The crash of waves and salty air are the signs of freedom
-
Senior Member
Undisclosed Pod
I don't think it'll work with silicone, and it will stain you and everything it touches. It's a dye and it's supposed to soak into a material. Silicone encapsulates pigment, it doesn't absorb dye.
I could be wrong, but I have a strong suspicion that it's a fail.
Plus, it might inhibit curing. Only way to tell is to do a small test! Good luck!
-
Oh, that actually makes a lot of sense. I'll order pearl ex online just to be safe. Thanks PearlieMae!
The crash of waves and salty air are the signs of freedom
-
Dear Indie, I concur with Pearlie that it's not a very safe thing. I've made bad experiences with liquid dyes and silicone. Either it doesn't cure at all, or it cures to quickly and ends up loosing all its flexibility. Either way it Never produced a nice even color. All in all I wasted a lot of money on those tries.
I'd strongly advise to get dry, powder pigments for the purpose of silicone coloring.
-
Senior Member
Undisclosed Pod

-
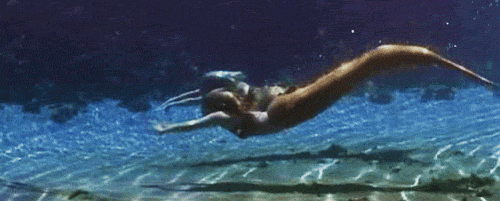
My individual scale tail attempt
Yea, I'm going to stick with the peal ex to be safe, I know they work and the colors are beautiful. The only problem now is I have too many ideas for colors! I should probably finish my fluke mold first lol
The crash of waves and salty air are the signs of freedom
-
 I love your fluke design! and your scales design! and your side fins design! I'm following this thread
-
@MermanOrdep Thanks! 
The crash of waves and salty air are the signs of freedom
-
So a bit of an update! My fluke mold is done and I've been sculpting out scales. I'm ordering my silicone on Friday, EEEEP!!! I'm so excited!!! I'll post pictures tonight!
The crash of waves and salty air are the signs of freedom
-
I ordered my silicone! I'm so excited! Next up, pigment!
-
SCREECH IT CAME IT CAME OMG IM SO EXCITED. MY SILICONE HAS ARRIVED SO MUCH FASTER THEN I THOUGHT IT WOUOD IM SO EXCITED
The crash of waves and salty air are the signs of freedom
-
Am I just an idiot or...
I cannot get the silicone bucket open, at all. I tried, I watched the tutorial video on the smooth on website for how to open it and nada. Help
The crash of waves and salty air are the signs of freedom
-
Senior Member
Undisclosed Pod
the six notches on the side of the bucket lid need to be cut. I use wire cutters because they are safe than a knife. Then lift each section going around the bucket one at a time. Do this on a clean floor and keep something handy nearby to scrape it up in case you spill it.

-
Thanks Pearlie! I succeeded in getting them open only to spill some all over the floor  but! I still managed to pour 2 scales and an ankle fin
The crash of waves and salty air are the signs of freedom
 Posting Permissions
- You may not post new threads
- You may not post replies
- You may not post attachments
- You may not edit your posts
-
Forum Rules


 Reply With Quote


Bookmarks