Page 1 of 3 123 LastLast
Results 1 to 20 of 55

Thread: Novice tail making adventures in Oregon

  1. #1

    Novice tail making adventures in Oregon

    So after nearly 3 years of "I'm totally going to do this", I am finally totally going to do this. I'm making a mermaid fin.

    Can I just start out by saying that I had no idea how hard it would be to come up with an original design?? I've tried my hardest to come up with an original sculpt that *hopefully* doesn't mimic other fin designs out there already.. but I'm still paranoid. Heck.

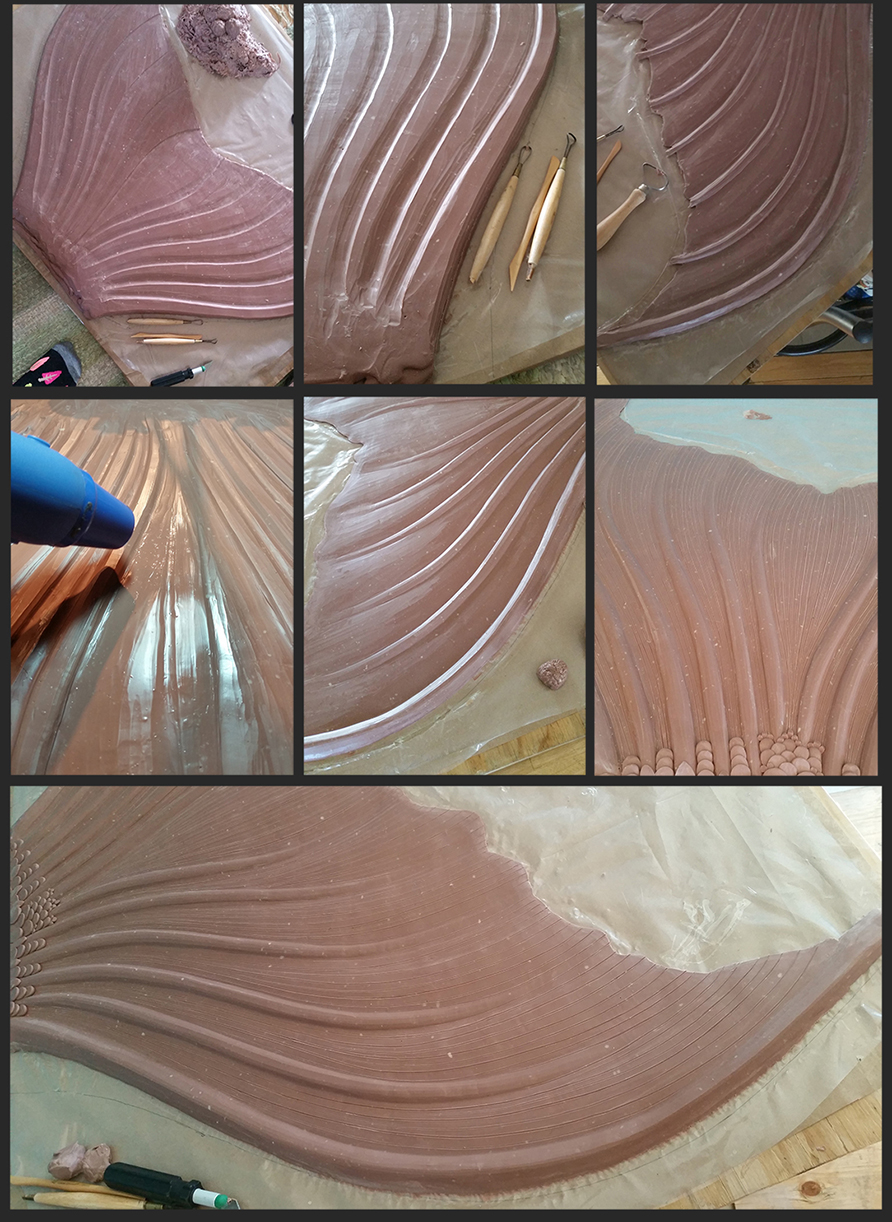
    So basically, I have no idea what I'm doing but I'm doing it with gusto. I started and finished my scale sheet about a year ago and I finally just had time to start on the fluke. The fluke was going to be last summer's project but then work was like "Oh btw, mandatory 60 hr work weeks all summer". Fantastic, thanks guys!

    For this sculpt I used approximately 15lbs of monster clay and heated each of the containers in the oven for 2 hours until they became a liquid consistency. I made a simple fin shaped cardboard wall over some parchment paper and had my bf jiggle the board while I poured the liquid monster clay into it. This gave it a relatively even surface and saved me the time of getting all of the clay leveled by hand. Monster clay is amazing because I was literally able to pry the clay fin completely off of the board and turn it over to remove the parchment paper. Its such durable clay.
    Next I took my larger tools and started evening out the surface of the clay. I had a trace of my fin design on a separate sheet of paper which I would periodically place over the clay to check the shape. This entire sculpt was made using a takeaway technique because I thought that might give me a little more control over line consistency. Most art is trial and error but making this fin is such a high stakes project that I wanted to take my sweet time in making sure this would all turn out perfect the first time around. We'll see when the mold is done though!

    More updates at a later time! I hope this is interesting or helpful to someone out there. I know I personally LOVE reading through peoples tail making threads to see the unique techniques people use . Y'all are so talented!
    Name:  FENPROGRESSsml_1.jpg
Views: 712
Size:  751.3 KB
    Name:  FENPROGRESSsml_2.jpg
Views: 679
Size:  813.7 KB

  2. #2
    Senior Member Undisclosed Pod Mermaid Summerlilly's Avatar
    Join Date
    May 2015
    Location
    Quebec
    Posts
    213
    Follow Mermaid Summerlilly On Twitter
    That looks amazing! Good luck!
    beep boop get some soup

  3. #3
    Senior Member Pod of Oceania moomer's Avatar
    Join Date
    Jan 2017
    Location
    Newcastle, Australia
    Posts
    119
    This looks amazing!! Well done!!

    Sent from my Nexus 5 using Tapatalk

  4. #4
    Senior Member Pod of Cali Ashton's Avatar
    Join Date
    Jul 2013
    Location
    Southern California, Dallas Tx
    Posts
    1,525
    Add Ashton on Facebook Add Ashton on Google+
    Follow Ashton on Tumblr Visit Ashton's Youtube Channel
    Great work so far!

  5. #5
    fantastic fluke! And- melting clay- thats so smart... I can't help but lament the fact that I probably would have been far more mentally and emotionally stable during the tailmaking process if I had circumvented smoothing clay...


  6. #6
    I love your sculpting work. Following with great interest.

  7. #7
    Thanks everyone! I'm way too excited to have this finally come to life!

  8. #8
    Senior Member Undisclosed Pod
    Pod of New England
    Marinus Mortimer's Avatar
    Join Date
    Sep 2011
    Location
    Holyoke, MA
    Posts
    1,188
    Add Marinus Mortimer on Facebook
    Visit Marinus Mortimer's Youtube Channel
    Quote Originally Posted by merwandering View Post
    fantastic fluke! And- melting clay- thats so smart... I can't help but lament the fact that I probably would have been far more mentally and emotionally stable during the tailmaking process if I had circumvented smoothing clay...
    Took the words from my key pad well said
    Its a great technique and great job on it it looks great btw


    Sent from my iPad using Tapatalk
    Marinus Mortimer
    formerly known as:
    Merman Marinus


  9. #9

  10. #10
    Yay another Oregon mer!!!! Love your technique, very awesome.


    Sent from my iPhone using Tapatalk

  11. #11
    Moderator Pod of Cali Mermaid Wesley's Avatar
    Join Date
    Sep 2012
    Location
    Los Angeles Area
    Posts
    4,147

    Visit Mermaid Wesley's Youtube Channel
    Oh woooowwww so pretty <3


    Sent from my iPhone using Tapatalk

  12. #12
    Progress! My goal was to have all molds made by June first. I had better get my butt in gear.

    I went all out and used Smooth Cast 300 for my molds. I have worked with it before, its an easy 1:1 part mix ratio and heck, I'm going to be reusing these molds forever so they might as well be fabulous. I hot glued a cardboard moat around the mold and made sure to use gloss coated cardboard for absorption resistance. I mixed small batches of Smooth Cast and poured them in layers. This isn't necessarily a trick or anything, I just didn't have a large enough container to mix it in and this stuff cures FAST. Like, 4 minutes fast. You can see that little clumpy area where my resin started hardening in the cup while I was pouring it!
    Name:  a1.jpg
Views: 557
Size:  898.5 KB

    I made sure to do a test mold first with some small fin things. There was some resin seepage under the sculpt so I had to break some thin layers of resin off of the sculpt before pulling it out. Easy enough, but I need to take a dremel to the edges now. I have fixed this problem with the fluke sculpt so there should be no seepage when I turn it over. Thank goodness for tests! I was also surprised at how "well" the actual sculpt was able to lift out of the mold (this is without any cleaning either). Ideally I'd like my fluke sculpt to come out relatively unharmed but we'll see how lucky I actually am . Lastly, I'm finishing up a modpodge coat on my scale sheet and finishing two extra fin sculpts. Tip: I've found that drywall is an excellent backboard for sculpting. Easy to cut, lightweight, and cheap. Just make sure to cover it with plastic, tape, or wax paper because resin will NOT come off of it if directly molded on. I learned the hard way.
    Name:  a2.jpg
Views: 468
Size:  563.4 KB

    This forum thing is also pretty foreign to me so I'm not replying to every individual response.. but I appreciate you all and the kinds words! Just know that <3

  13. #13
    Senior Member Undisclosed Pod PearlieMae's Avatar
    Join Date
    Jul 2013
    Posts
    6,661
    Follow PearlieMae On Twitter Add PearlieMae on Facebook
    That's a beautiful fluke sculpt! Nicely done!

  14. #14
    Senior Member Pod of Cali Ashton's Avatar
    Join Date
    Jul 2013
    Location
    Southern California, Dallas Tx
    Posts
    1,525
    Add Ashton on Facebook Add Ashton on Google+
    Follow Ashton on Tumblr Visit Ashton's Youtube Channel
    I look forward to seeing your fluke come out.

  15. #15
    Senior Member Pod of Oceania moomer's Avatar
    Join Date
    Jan 2017
    Location
    Newcastle, Australia
    Posts
    119
    I am loving the look of your fluke!
    And great idea using foam circles (I am assuming they are foam).
    Can't wait to see more!

    Sent from my Nexus 5 using Tapatalk

  16. #16
    Member Chesapeake Pod
    Join Date
    May 2017
    Location
    Big island Hilo Hawaii
    Posts
    45
    Add Mermaid hannahML on Facebook
    Oh my I love reading through people's threads and this ones got me excited to make one of my own

  17. #17
    Above and beyond my expectations. The sculpt was virtually untouched minus the slightly bothered scales at the top and separating the mold took less than a minute. This is also a photo of the mold with zero cleaning done to it and I'm genuinely shocked! I was expecting to do a lot of clean up until the molds were ready and now I get to keep the fluke sculpt in case I need to do any alterations or additions in the future. Talk about a time saver!! Silicone Tests and pigment education next.
    Name:  a3.jpg
Views: 564
Size:  498.3 KB

  18. #18
    This fluke is so lovely.. You're very talented

    Sent from my F8331 using Tapatalk
    Owner/Operator behind Tails & Portholes
    Store Blog
    - Personal Blog - Twitter - Instagram - Store Facebook
    This treasure cums for YOUR booty

  19. #19
    Senior Member Undisclosed Pod
    Pod of New England
    Marinus Mortimer's Avatar
    Join Date
    Sep 2011
    Location
    Holyoke, MA
    Posts
    1,188
    Add Marinus Mortimer on Facebook
    Visit Marinus Mortimer's Youtube Channel
    Quote Originally Posted by KatieScottArt View Post
    Above and beyond my expectations. The sculpt was virtually untouched minus the slightly bothered scales at the top and separating the mold took less than a minute. This is also a photo of the mold with zero cleaning done to it and I'm genuinely shocked! I was expecting to do a lot of clean up until the molds were ready and now I get to keep the fluke sculpt in case I need to do any alterations or additions in the future. Talk about a time saver!! Silicone Tests and pigment education next.
    Name:  a3.jpg
Views: 564
Size:  498.3 KB
    Thats how i felt with my molds they just came right out no damage at all! Congrats on a successful mold!


    Sent from my iPad using Tapatalk
    Marinus Mortimer
    formerly known as:
    Merman Marinus


  20. #20
    Member Chesapeake Pod
    Join Date
    May 2017
    Location
    Big island Hilo Hawaii
    Posts
    45
    Add Mermaid hannahML on Facebook
    It is looking amazing so far keep up this good work

Bookmarks

Posting Permissions

  • You may not post new threads
  • You may not post replies
  • You may not post attachments
  • You may not edit your posts
  •