


Looks great so far!

Looks great so far!
WOW, that's a gorgeous fluke sculpt!!
Beautiful beaded tops and silicone fins and flukes for enhancing your tail at my Etsy shop: Fancy Fish Fashions!
Follow me on Facebook


You're fluke is lovely! I love classic shapes but interesting details!
Do you know, can you use that melting technique with any oil based clay? Or only monster?
Sent from my iPhone using Tapatalk
The fluke is lovely *^^*
~Neerai Every, the Pirate Mermaid~

I believe that you can use this method with at least a few oil based clays to the best my knowledge. My coworker said that he used to soften and melt both Chavant and NSP clay before use (he used to sculpt for Matel). Both are sulfur free, oil based clays. They had different methods of heating the clay too including a microwaveable popcorn bucket in the microwave and a crock pot.Originally Posted by Mermaid Kalahari

I say try a small test first to make sure!
Wow, very impressive so far!
~Merman Rett Of Georgia~
(Formerly Known as Risingmermaid)
Thank you again everyone! Posting my progress on here helps me stay motivated. I appreciate your support!
Updates:
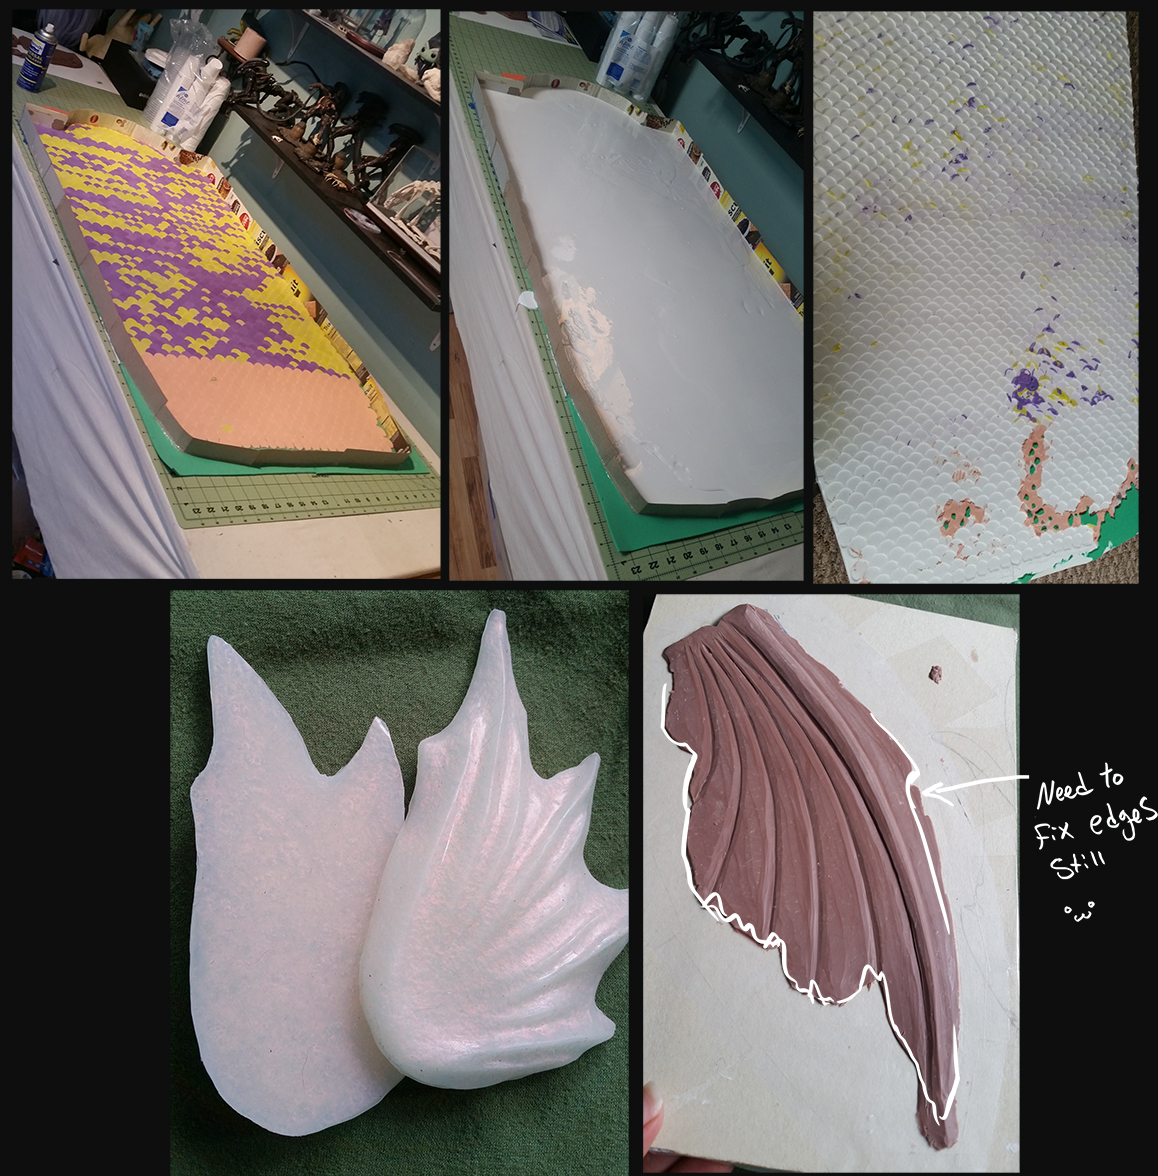
-Scale sheet has been molded using Smooth Cast 300 Fast and still needs a ton of TLC. In hindsight I should have used WAY more mold release because cleaning this is now the bane of my existence. However, I did save my own ass by filling in all the tiny gaps with Mod Podge before pouring the resin. The mod podge that is still stuck will need to be scraped with an exacto knife and sanded with a dremel. Dang.
-First pair of extra fins are nearly completed and will be molded tonight. Second pair of extra fins will be started and finished this week as well. Third pair of extra fins?? We'll see.
-First test pour of Dragonskin 10 Fast has been successful. I mixed a rose toned pearlescent pigment into the silicone just to see what the effect would be. I love it.
-Next on the list are the airbrush tests. I will be using Psycho Paint and NOVOCS Gloss silicone solvent along with my small airbrush setup. Pigments used are yet to be determined.
I am also planning on building a janky-ass paint booth that can either be set up in my studio or set up outside. I'm thinking a super simple PVC frame, collapsible table and Painters Plastic for the walls. This way I can literally pull it apart when I'm not using it.
I have a long weekend this week.. so my goal is to make the tail this weekend. This will all depend on how productive I am in the next three days though (on top of my job) so fingers crossed!
Love the fins!
Sent from my iPhone using Tapatalk
OMGoodness that looks amazing!Keep it up dude!
"The Mer in me, it's easy to see. Long golden tresses, a heart set free in the Sea."
I had intended on starting my fin this past weekend but a few things were still giving me sass, namely my scale sheet. I have to dremel the entire thing again and I've already spent two solid days working on cleaning it. Note to self: USE MORE MOLD RELEASE.
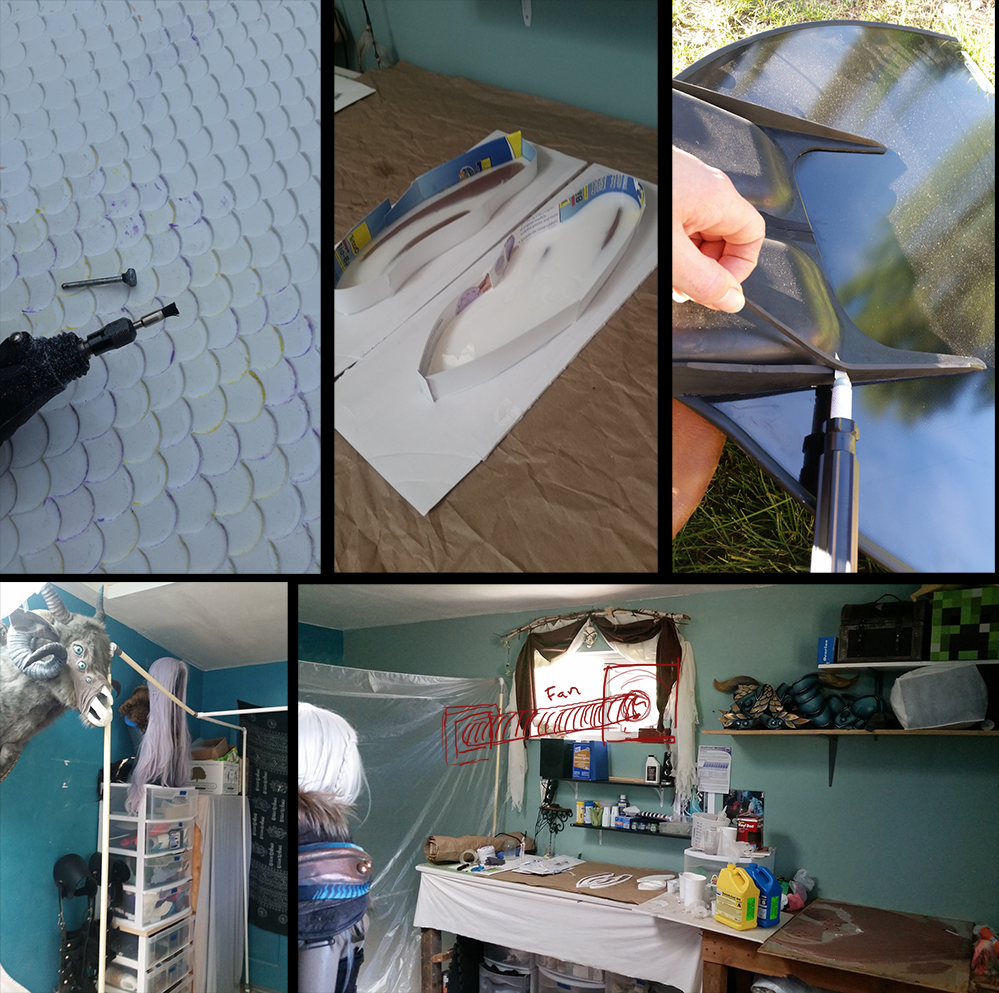
-I built a janky-ass "paint booth" in my studio using PVC and leftover painter's plastic but I still need to rig a makeshift fan system for air flow. I don't have an available garage space to do the painting out of and our back yard gets windy and dirty.. so I don't want particles landing on the wet silicone paint. I airbrush other projects every so often so this structure won't be solely for mermaid tail painting.
-I trimmed down the rubber ridges on my Leaderfin Sport monofin so that they wouldn't be visible under the silicone. I also trimmed around the foot pockets and heel straps a bit. If I'm having a hard time getting my feet into the monofin without it attached to the tail, its going to be dang near impossible to try and get my feet in later. I also have to cut the carbon fiber fin itself to fit in the fluke shape I sculpted. I really hope cutting it doesn't interfere with the structural integrity of the fin too much.
-Extra extra fins were made and cast in resin. I might do another set just for fun.
-I have yet to do airbrush tests too. I heard that having a "gravity fed" airbrush is best. I have a bottom fed "precision" air brush so I might look into getting just a big clunky gravity fed brush to get the big areas painted. I don't know. It might be spendy and not necessary?
I think the airbrushing part is the scariest bit for me. I just don't want the brush to get clogged and waste paint and time.
I'm still trying to figure out what type of "glue" to use to glue everything together. Would using more Dragonskin be best? Or would a Tin-cure silicone be a decent option (caulking)?
Do tests on scraps!
Sent from my iPhone using Tapatalk
I don't know why I didn't consider that, haha. Thank you!!
Well, my goal was to finish this during the weekend (4 day weekend due to the holiday) but I had some bumps along the way.
-setback #1: I didn't test or even think about the fact that the rubber on the monofin foot pockets is a cure inhibitor. Obviously the silicone touching the rubber areas didn't cure so I had to clean those areas with paint thinner to remove the waste. The quickest solution I could come up with was to paint the rubber foot pockets with a thick layer of acrylic paint to provide a good barrier in case the silicone touched it again. This worked!
-Setback #2: Pigmentation. I think I'm mixing my pigments too thin because they are not covering the opacity of the silicone well at all. I mixed some pigment into the initial pour but I need to try and thicken the top coat paint so that the monofin is not visible.
-Setback #3: Airbrush. The gravity fed airbrush I have does not work with my small compressor due to the low PSI. I had to use my nice airbrush for this first pass but it took WAY too long. I had to order another compressor so that I can get the areas even and actually have the paint flow at a decent speed.
Continued on Friday when the compressor arrives.


I mixed so much pigment into my silicone that it I basically had to add A to B or pigment would have flew everywhere. And it still cured.
Oh and I love your fluke btw!
Sent from my ShellPhone using Tapatalk
Good to know! I'm probably just being too sparing with my pigment usage
You're welcome, I was very apprehensive that I was going to add too much pigment.
Sent from my ShellPhone using Tapatalk
Your suggestion really really helped! I went home during my lunch break to test the "more pigment" painting technique and long story short, it worked like a charm. I kept remembering your comments as I mixed. My airbrush exploded so I had to resort to using a brush but that actually worked extremely well for the base coat. I might do that all the time for the now! Thank you!
You're very welcome!
Sent from my ShellPhone using Tapatalk
if you're using... I think it's called the lacing method(?) on your fluke, you can get an opaque but thin but very shimmery fabric, and since it will be cut to the shape of the fluke, can help hide the monofin, and still retain some of the aesthetic and depth of the outer layer being a little more translucent:)
if that makes any sense
Well Jeeze, I didn't even think of that! I actually used some Power mesh on one side of the fluke cast for added support but using shimmery fabric is brilliant. I've seen it done once I think but I hadn't considered it to be a solution to my problem. THANK YOU!
 Posting Permissions

 Reply With Quote


Bookmarks