Thank you everyone! I'm so sorry there hasn't been any updates recently.One more week and I can start working on it again.

Thank you everyone! I'm so sorry there hasn't been any updates recently.
Ooh, looking good! following to see how it progresses
Mermaid Kerenza Sapphire
Photographer, mermaid shop, mermaid parties & photoshoots for grown ups in Essex and Suffolk at Mermaiding UK
(also a UK Fin Fun stockist) - mermaiding.co.uk
Formerly known as "Mermaid Carla"
Whew! First update in a long while! Sorry I Haven't been keeping up very well, things always slow down a lot this time of year. But, great news, yet another step is out of the way! All of those nasty holes left by the drill are filled in and smoothed out, and I've taken a piece of sandpaper to the whole thing to help smooth out the high points.
Here's a small patch of the finished scales!
There are still a few problem areas that I'm not too excited about, but at this point I think there isn't much I can do by just putting more plaster over it and trying to smooth it out. hopefully, some of the issues will be resolved by the next step, which is covering the whole thing in a glossy coating to take away the dullness of the plaster. I've been told varnish is a good gloss to use. Any particular warnings about the stuff?
A beautiful glossy finish to a long hard journey! I know it's just the scale mold, and the tail is probably about a month from actual completion, but it sure does feel nice to reach such a big milestone! I'm so excited to see how the body piece will come out. A few samples I made a while back were made with a small sample mold, without the gloss, and they came out looking so dull and boring, but hopefully with a varnish finish they'll keep the luster from the pigment!
Sent from my iPhone using Tapatalk
Wow it looks really good! I love watching the progress of such a unique project.
Your journey is very interesting to follow!
About your mold have you thought about how to fix the spaces between the scales? (sorry if you already said that, but I lost some updates)
Also when your silicone will cure do you think you'll go for a one seam tail or do you have any other ideas?
Sorry for all the questions, is just that I think no one made a tail in this way here before, and I'm so curious about it!
Follow me at Facebook - YouTube - Instagram - Twitter - Google+ - or ask me anything you like at Ask.fm
<a href="http://freegifmaker.me/images/2fiQu/"><img src="http://i.freegifmaker.me/1/5/5/8/4/6/15584685451852341.gif?1558468561" alt="gifs website"/></a><br/><a href="http://www.freegifmaker.me/">FreeGifMaker.me<a/>
~мєямαι∂ кαѕѕαи∂яα~
Just made and painted a little sample of some scales. So apparently the gloss wasn't needed at allthe original scales came out looking dull, but after the second coat they're so shiny...
To answer your question Kassandra, the body tube is made so that it will actually be formed all as one piece,m. So technically, it will have zero seams. As for the spaces between the scales, when I was originally drilling them, because the mold changes in diameter from the ankles to the hips, using the same size scale will sometimes fail to cover the entire area. Hopefully some day I'll figure out a way to get around that, but this is my first tail, so I'm okay if there are some flaws. Painting it will hopefully hide most of my sins.
Sent from my iPhone using Tapatalk
That's lovely!! I can't wait to see this whole thing come together! How are you going to do your fluke? Are you going to make a sculpted silicone fluke or just use the sheets?
Sent from my iPhone using Tapatalk
So the fluke is going to be the next big challenge. I changed the design to something a little more classical and less dragon like, (sorry dragon tail, maybe next time.) because after a bit of research that design is incredibly slow in the water. What I've changed it to isn't exactly the fastest (the design for something actually fast in the water would be crescent shaped, like a tuna), but it IS better than what I had before. And keeping with the promise to keep it monofinless, designing the foot pocket has been a challenge. I have A design, but I wouldn't be surprised if I have to change it again.Originally Posted by Mermaid Wesley


Here is the new shape along with the design for the foot pocket, or I'm probably just going to call it the shoe or something. The two flaps you see on the side are going to fold up over my foot, and I'm not sure about he next step yet, but I'm thinking we will fill in some of the larger spaces left with foam or something and then fill the remaining area within the shoe with silicone. The next pictures will make it make more sense.
Side note: sorry my nails are so gross I haven't had time to remove the polish. I'm also very excited to find a use for those mermaid socks. It makes me actually excited to post pictures of my feet
Sent from my iPhone using Tapatalk
That looks cool! I'm excited to see all this innovation!
Sent from my iPhone using Tapatalk


Wow! I agree with Wesley, wholeheartedly!
"Please don't fucking drown." - Regina, my daughter
http://www.pearliemae.net
https://www.facebook.com/MermaidPearlieMae
https://www.etsy.com/shop/PearlieMae
http://pinterest.com/oldhamedia/oceana/

Your socks though..... Your doing a MERMAIZING job!
Sent from my 0PJA2 using MerNetwork mobile app
From Online Image Editor
That "shoe" idea is brilliant!
Sent from my Moto G (4) using MerNetwork mobile app
Thank you everyone! your support is so encouraging! My tech guy (aka dad) and I are getting into the deep discussions of how to get the blue and white pigments to blend evenly on the mold. In other words, silicone day is coming up!! It won't be long now, and my child will finally start coming into form! (yes I'm calling the tail my child. I'm also going to name her, but I don't know what yet.) So in other words, very excited!! Happy mermaiding everyone!
First sketch of her! I probably should have posted one of these a loooooong time ago but oh well! Here you go!
Sent from my iPhone using Tapatalk
It has begun... the silicone is officially being laid. I'm just doing this very thin layer technique for the bottom because it creates a really cool effect with the silver.
You can see it in the sample I did here. It didn't come out great because 1- I only used one layer of silver color, and 2- I didn't exactly wait for it to cure all the way.
Anyways, I'm so excited to actually start making the tail itself!! I've worked a loooong time to get to this point.
Sent from my iPhone using Tapatalk
This totally looks awesome so far - what a cool journey to watch, I can't wait for the finished product!!
International competitive freediver, mermaid and owner of Blue Water Freediving School - YES we run Mermaid courses and are suppliers of the leading monofin brands, including the brand new Ocean Star mermaid monofin!
https://www.youtube.com/watch?edit=vd&v=5iGwkUaztLc
https://www.bluewaterfreediving.com/
Finished adding a few layers of textured silicone (the silver) and just applied the first batch of plain clear stuff. I'll be SOOOO happy when this part is finished and I can move on to the fluke. Only a few more days!!
Sent from my iPhone using Tapatalk
A quick idea note - carbon fiber rods are used extensively in sport kites, and there are a variety of fastening devices. An idea is to investigate that, and build the rod structure outside of the silicone pour. High-strength epoxy works well to cement the rods into the metal holders. You could even try making a spreader fan holder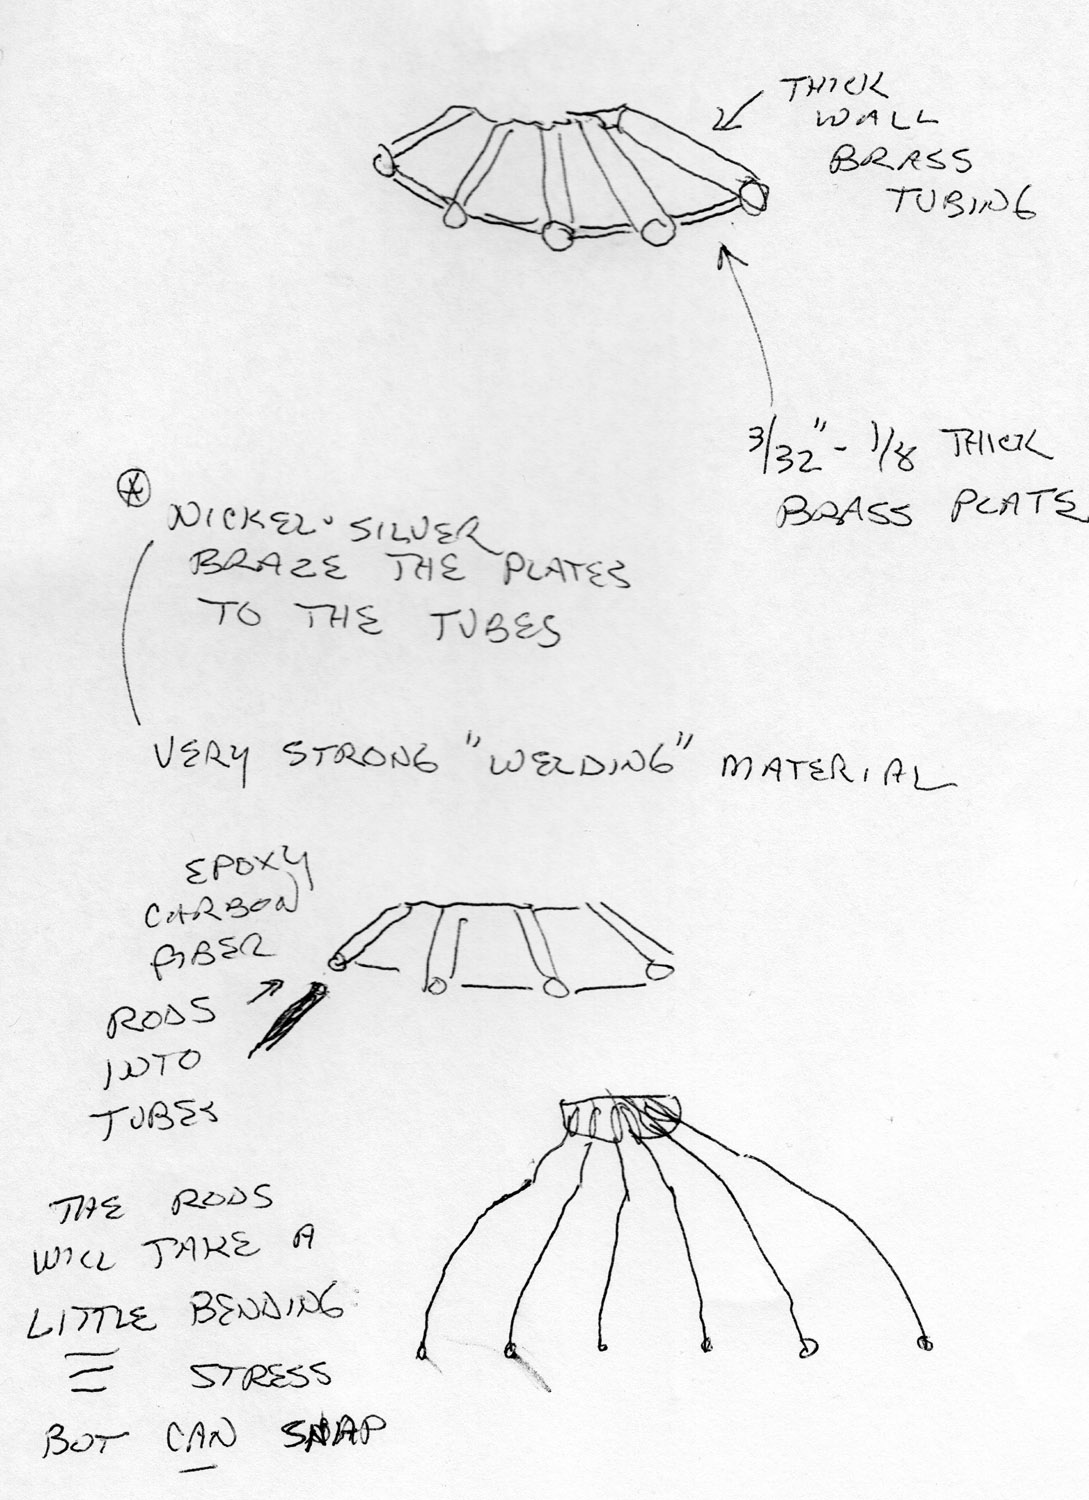
This is amazing. I love your studio setup, so jealous! Out of curiosity, what silicone are you using that you can sort of paint it? I'm having trouble using GE 100% but looking at yours I'm wondering if it's possible to apply colour to it while it's curing.
 Posting Permissions

 Reply With Quote


Bookmarks