-
Two-tailed project! One fabric, one silicone
Since you all are so incredibly helpful, I decided to start my own thread here. I'm working on two tails: one for my daughter, and one for me.
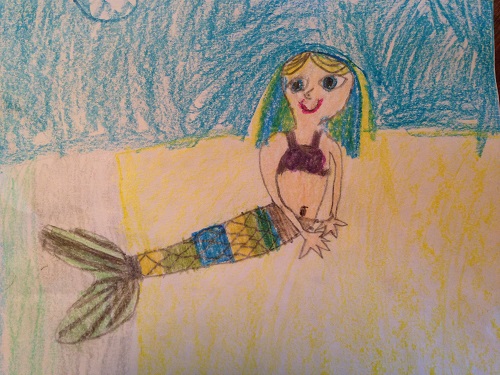
You can read about the adventure I've had trying to make Rowan's tail over here...the body's all painted and now I'm working on the fluke. I'm very lucky I have a little girl with a sense of humor, who thinks it'll all be just fine even though I goofed up the pattern so dreadfully.  Her fluke's mono fin is lexan, with some cheap Target pool shoes glued on with poly-zap. Although it went very well in our test run last weekend, I'm thinking she'll probably need bigger shoes come summertime. And the bottoms of the shoes aren't really the best for being glued anyway, so I'll have to come up with something else (probably the zoomers + glue method).
 Rowan's tail will be awesome!
For my tail, I'm going to use individual scales over power mesh. We just don't have the room for a scale sheet in our house. Not sure what I'll use for my mono fin. I've got a fin fun fin, but after training on a Finis Rapid for the last four months for exercise, then trying the lexan again, I found it unbearably floppy! But I hate the thought of cutting into my Rapid. Has anyone tried doubling up on lexan sheets for a stiffer fin, or trying thicker sheets than one can get in Home Depot/Lowes? I do like the clear look, but I also like the serious power of a real fin. Decisions, decisions...
Because I'm a biologist, and also because I don't want to straight out copy all the marvelous shell-scale patterns, and because I'm too lazy to make small scales, I'm going to sculpt bigger, flatter, more fishy-looking scales. Today, just for fun, I whipped out some old pottery clay and the leftover Dragon Skin from the summer, made a couple of molds, and tried the pigment-in-the-silicone method. I'm curious to see if I can get away with just sculpting scales in clay directly, instead of making molds. (Probably not). We're on a tight budget this year, and clay's cheap. I also am not putting all that much detail into the scales, since I'll be painting them too. I haven't had a painting class for 20 years now, so this should be interesting!
Project Two Tails is complete! For the record, here are the materials we used and some final thoughts.
Individual tail materials:
Sculpts: Van Aken Plastilina clay, Michaels brand plastilina clay, and gumpaste tools from Wilton (long story...)
Resin: Smooth Cast 300 from Smooth On
Silicone: Dragon skin 10 slow from Smooth On
Pigments: Pearl-X pigments from Jacquard. One jar of each color was sufficient for the entire tail, with tons left over. I used antique copper, super copper, aztec gold, turquoise, pink gold, and sparkle gold
Dummy: shopping bags, packing tape, stuffing
Body lined with: powermesh from Jo Ann
Monofin: Lexan from Lowe's, cut with a jigsaw using a plexiglass blade, edges sanded smooth. Feet secured with Pearlie Mae's soon-to-be patented method (contact her for permission and details)
Final thoughts:
1. TAKE THE DUCT TAPE DUMMY SERIOUSLY. Have someone help you. I did it by myself, did it quickly and shoddily. Now I have a small but noticable lump in my tail's shin. I thought, "hey, it'll stretch out when I'm wearing it" but nope...it doesn't. Also, bring in the waistline of the dummy by an inch or two (I haven't actually done this, but I should have) to avoid gapping waistlines.
2. More on duct tape dummies: I used plastic shopping bags to protect my skin, and packing tape instead of duct tape. Duct tape will stretch out, but packing tape won't.
3. Make more scales than you need. Then make some more. 
4. You might as well buy an extra bucket of silicone, too.
5. Wet silicone doesn't come out of clothing. Or carpets.
6. Cats are attracted to silicone. Seriously. Protect them and your project by keeping an eye on both, or better yet, having a project room with a door. (Cat hair in your silicone is inevitable. Think of it as their artistic contribution.)
7. Nobody notices the clear drips and blobs that inevitably happen when you miss a drippy spot when gluing things together. Trim off the easier, drippier-looking ones with nail scissors, and ignore the rest. Nobody else has noticed them. In fact, they look just like more water drops on a tail already covered by water drops.
8. As mentioned by several people: ankle creases are inevitable too.
9. If you've ever worked with glitter in your life, or have an eight-year-old kid, you WILL have glitter in your tail. (sigh)
10. Dusting over silicone with powdered Pearl-X pigments will give you an amazing luminous, lustrous metallic sheen that as far as I can tell cannot be replicated with other methods (I haven't tried airbrushing yet). But it will make the silicone top coat unable to effectively adhere to the pigmented layer beneath. I don't care because my scales are all tinted under the paint. It's only the tips that will wear away, which is OK for me because I'm going for a more organic look. I love the wear patterns that are starting to show already. So tint your underlying silicone the color you want to show when the paint starts rubbing off. as it inevitably will.
11. Don't go with wooden sticks for leaving drainage holes, even wrapped with saran wrap...they're an absolute bitch to pull out later. Next time I'll try something metallic that (1) I can grip with pliers and (2) won't break midway through the process. Sheesh.
12. Lexan from Lowe's is sufficient for a lovely stiff monofin. Mine has more propulsion than my Finis Rapid. Whoooosh!
Painted spandex tail materials:
Spandex: royal blue, forest green, and silver from Jo Ann
Paints: Jaquard lumiere and opaque paints (don't remember exact colors)
Monofin: lexan from Lowes, feet secured with pool shoes from Target glued on with Poly Zap glue.
Silicone on body: dragon skin FX, fast
Silcone on fin: dragon skin 10, slow
Final Thoughts (after 10 or so swims):
1. You really have to use a lot of layers if you want true colors on dark colored spandex. Yellow/gold and green were particularly difficult to get looking nice on blue.
2. Silicone won't grab painted areas if the paint is too thick.
3. Areas that are too thick will chip, even if (1) you painted them while the fabric was stretched, and (2) you protect them with a layer of silicone.
4. That said, silicone makes an excellent protective barrier for spandex in the pool. The body of the tail still looks like dynamite, even in the areas (knees, heels) that usually get wear.
5. Also, a layer of silicone will make fabric look permanently wet (i.e., darker), which can really bring out the contrast of a lighter paint job.
6. Wear on silicone-covered spandex shows up as white scarring. You lose the opacity inherent in the silicone.
7. Paint beads on the surface of spandex, making it very difficult to blend nicely. I'm no expert, but I'd go with an airbrush next time if I wanted to make more subtle scales. With spandex, a bold pattern is probably better. Neoprene seems to be easier to paint.
8. Putting silicone on spandex drastically reduces its ability to stretch!
Last edited by Dancing Fish; 08-14-2015 at 01:09 PM.
-
First couple of practice scales turned out cool, though. So the answer is yes, you can cast your silicone directly into wet clay and it peels out beautifully. But...unless I want this tail to take months, I'm going to have to make sturdy molds with multiple scales or I'll go insane. Also saw recommended multiple times, use oil-based clay or it'll crack as it dries. (Or pour while it's still wet? Might as well get the Plastilina that Pearlie Mae uses, 'cause there's a store here that has it relatively cheap, and it's half the price of Monster).
Rowan is so stoked-- she says she's going to take all the practice scales and make a fashion belt. After reading zillions of posts on the subject, it looks like Lowes is the place to go for resin. There's all these little details I want to ask about- what surface do you all put under your clay? Does the resin interact with or eat certain materials? Can I get away with a cheap sheet of plastic? Would a layer of saran wrap over wood also work? If the clay is not oily do I have to seal it? I'll just try it and see what I can get away with...
For reference, here is some good advice (I swear I've seen every post, and then I type in new key words, and...)
Tips for using fiberglass resin
Fiberglass resin can be removed with acetone, good to know. Sealing the clay with paint/acrylic first is also a good idea. Good stuff here!
Recommended brand: Bondo fiberglass resin, with or without fiberglass matting or cloth (not necessary, unless you need strength)
Mermaid Oshun recommends letting the fiberglass cure for a week then wiping down with acetone before use. If there's still a problem with inhibition of silicone curing, a single coat of clear acrylic lacquer will help.
Last edited by Dancing Fish; 02-01-2015 at 07:25 PM.
-
Progress! I've been in "gather as much info as possible because I'm too scared to screw up" mode and thought, heck with that noise, time to dive in. First run will be heel fins. Although after spending a few hours crafting this, I wonder if they're not going to be too big. Bigger is better?
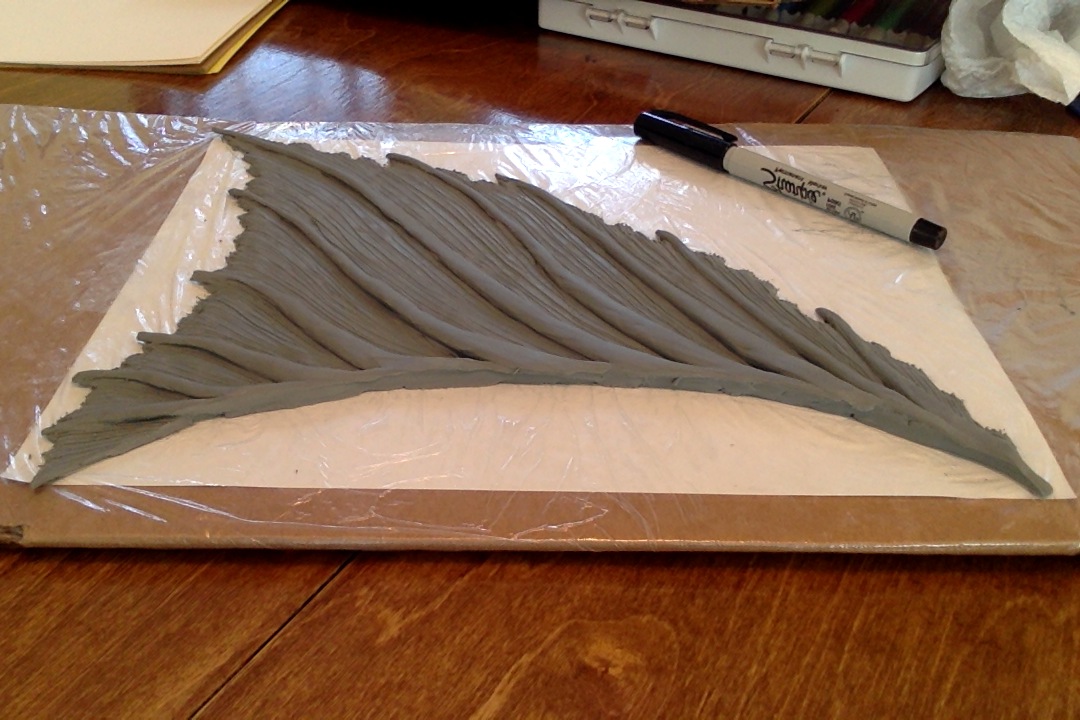
OK, here's the part where you tell me that fiberglass resin or smooth on will eat the saran wrap under my fin sculpture...  The clay's Plastalina.
I am hoping that by making the attachment point curved, I'll get a small bit of a ruffly effect on the ends. Does anyone know another way to get that beta-fish ruffly end look?
.
Last edited by Dancing Fish; 02-15-2015 at 09:39 AM.
-
I don't think it's too big. Since it's longer it's more like a heel dorsal.
Here you can see tails with different heel fins.
https://mermaidtailcollection.wordpr...ry/fins/ankle/
-
Oh, wow! Thanks for the link! Hmm, a heel dorsal, I like that. I'd been thinking of doing two fins, but actually one might be better given its size. I'll have to doodle it. Would also remind me not to stand on the fluke in the pool!
...and I also see I'm not the first to come up with a copper/teal color scheme, either. Mine's a bit stripier, though.
-
aaand I found my fishy tail shape for fluke inspiration, finally! Isn't she a beauty?
http://aqua.glover.it/aqua-btr/images/pic/image4.jpeg
-
This is SO. Much. Fun! Going to try pouring a mold tomorrow! I can't believe how well these turned out!
-
I love the shape of those!!! The whole tattered thing is so realistic! 
-
They definitely did turn out well! Did you get to pour the mold today?
www.youtube.com/MinxFox
I love: Peacocks - Mermaiding - Tropical Plants
That was her magic, she could still see the sunset, even on those darkest days. - Atticus
-
-
Wow great tail inspiration! I know how you feel I am already thinking of future tail designs and I have yet to stop being lazy and order more paint for my fabric tail. 
Congrats to your Daughter for saving up for an underwater camera! I might have to get one eventually too.
www.youtube.com/MinxFox
I love: Peacocks - Mermaiding - Tropical Plants
That was her magic, she could still see the sunset, even on those darkest days. - Atticus
-
-
Paused for a couple of days to make a swimsuit for the kid. Since most local pools don't allow the tail or even the fin, she wanted a way to be a mermaid anyway. She found this scaly foil in my craft bin and claimed it, and designed a skirt. So yeah, I'm not the world's greatest seamstress, and lycra hates me, but she thinks it's great!

As for the resin, I've got the materials but it's been so stupid cold outside the past few days and I just can't take it long enough to pour the molds down in my garage. Yes, I'm a wuss.
-
Oh holy mackerel, does Bondo resin STIIIIINK.
So I poured it about half an inch thick, and just when it was starting to gel, we had to banish it to the garage because resin stank was seeping upstairs to the second floor. So, uh...do you suppose freezing temperatures will interfere with curing too much? It's nicely hardened as of today. I was going to wait until tomorrow to start messing with it, but since it's a chemical reaction (I think) that relies on oxidation (I think!), and chemical reactions are slower in cold temps, should I give it a few more days or even weeks before I try unmolding?
GAH. Not doing any more resin until temps go up in the spring. STIIIINKYYYY! And I have cats that are far too curious for their own good, another reason I banished it to the garage quickly.
Apart from the stink factor, everything went pretty well. Mixing/pouring it was very straightforward. It looks like it'll be a nice mold when it's done.
-
Well, hell. A quick online search says (1) don't do it in the cold (ideal temps 60-70 F) and (2) if you do, use more hardener. I used less because the can said to do that if you mix big quantities.
I probably didn't need to pour it so thickly either. Meh. Eh, well. Worst comes to worst, I wasted a bunch of resin and a pretty dorsal mold, but I can do that again.
Last edited by Dancing Fish; 02-23-2015 at 08:45 PM.
-
I ordered my silicone today! Duuuude! 
 So excited!
Tried some "Amazing" casting resin from Michaels to make a scale mold, and it's wonderful. Cured in ten minutes, and no stink! It's probably the same liquid urethane stuff you can get from a bunch of places, and much easier to mix. I stuck a sample of Smooth Cast 300 in my order to see if it's the same thing. All my small-scale scale molds are going to be made of this stuff. I turned over the El-Stinko dorsal fiberglass resin mold and it proceeded to stink up the place again, but at least it is hard. I'm going to let the weather warm up and then let the thing de-gas for a good long while before seeing if I have to redo it. It's OK if I do, I'm still in prototype mode anyway. Not sure I still like the look of those dorsals anyway, given how tidy-looking the fluke is at the moment.
-
those are some very beautiful sculpts!
-
Thanks!
-
Eeeee! Scales!! No idea how these are going to turn out...
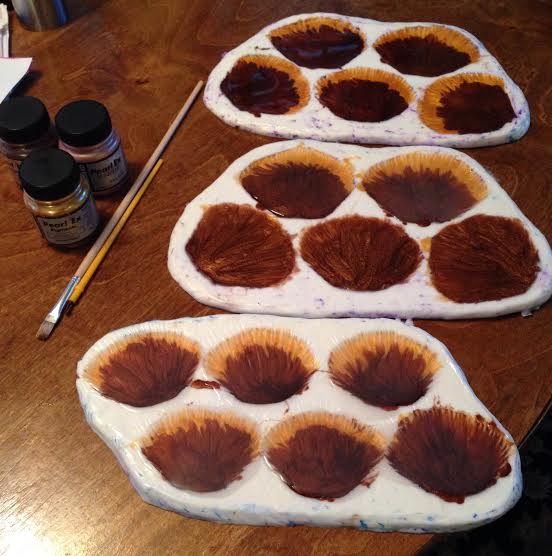
Going for copper and gold, nice and wide and flat. It's turning out more brown than copper, so far...
-
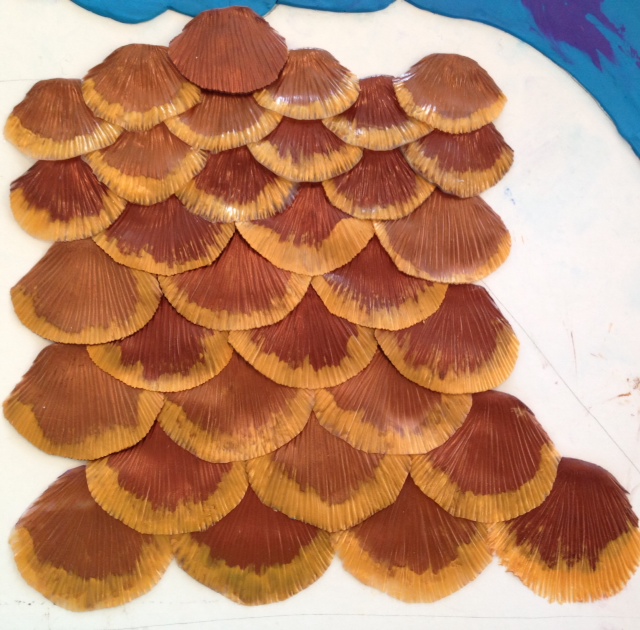
Well....here's round 1.
Interesting! I'm no Pearlie, but they're almost what I've been envisioning. So far I have two sizes, but I experimented with trimming to create a third. I think I need to standardize the stripe on the tip somehow, or at least make it a little smaller. Painting with this stuff is harder than I thought! The colors, on the other hand, are perfect. I deliberately tried to vary the brown tones a little, adding more pink to some and more yellow to others.
 Posting Permissions
- You may not post new threads
- You may not post replies
- You may not post attachments
- You may not edit your posts
-
Forum Rules


 Reply With Quote


 Finish this one first, woman!)


Bookmarks